Application name matters

If you are developing an application for your company with a brand name or if you are developing the next Angry Bird game with a cool new name, this post is not for you.

However, if you are concocting a generic application like a calculator, a converter, a task manager, you might want continuing to read this post.

Last year, I released the Ultimate Poker Manager along with the ad based version Ultimate Poker Manager Free. Those apps are a poker timer, a hand reference helper and a statistic manager that can produce a whole website with game results and a leaderboard. After a couple of months, I realized that my apps were not gaining traction as much as simple apps like Poker Timer or Poker Hands even if my app was more appealing.

With these results, I tried to rebrand the app for Poker Hands & Timer and I added it to the marketplace (only as a free app). I kept the old Ultimate Poker Manager Free in order to be able update the users that installed my app.

After one and half year, I can tell you that the Poker Hands & Timer has been downloaded twice as much as the Ultimate Poker Manager Free. My download count is in thousands.

I do believe that the marketplace search algorithm put a lot of weight on application name first. So in the end, don’t look for fancy names, keep it simple!

This post is not based on exact science but on my experience. If you agree or not, please feel free to comment.

Windows Phone 7 App Hub VS Windows 8 Dashboard

This week, Microsoft presented what I believe are the best announcements in the last 10 years: the coming release of the gorgeous Surface and the next Windows Phone 8 OS.

I was ready to blog about the new SDK of Windows Phone 8, but we have to wait until the SDK is released. However, we should be pleased that the core of Windows Phone 8 and Windows 8 will be the same.

Back to the blog post now!

Microsoft is serious about Windows 8. They ran a lot of interesting events for the developers. I must admit that living in a big city helps. Recently, I participated in the App Excellence Lab for Windows 8 where I was given early access to the Windows 8 Dashboard. I presented my port of my Windows Phone Canadian Developer Connection app to Windows 8. In a future blog post, I’ll talk about my experience porting an application from Windows Phone 7 to Windows 8.

For developers that submitted Windows Phone 7 applications, you will have dealt with the App Hub many times and you have probably seen some hiccups. Fortunately, the Windows Phone team gave the developers good news about the upcoming upgrade of the App Hub.

Right now, the Windows 8 Dashboard (that’s the current name) does not share the same system as the App Hub. In a couple of years, they might share a dashboard, but for now I’ll present some differences.

Dashboard

image

Submit an app

All the steps are well defined and you get the approximate time for each step.

image

Explore store trends

This is what I consider the best tool of the Windows 8 Dashboard. It gives you the ability to analyze what people install on Windows 8. I hope this feature will soon come to the App Hub.

image

Financial summary

This is the place where you find out if you’ll be millionaire one day.

image

Profile Account

I skipped the section Renewal, there was nothing interesting. The Profile Account is pretty normal except that you can change the Publisher name.

image

Microsoft Support

This is the second major feature of the Windows 8 Dashboard. Recently, I had a question to ask the certification team and I visited the support page. I was expecting to fill in a form and get an answer one or two days later like it is in the App Hub, but I was totally surprised that the Dashboard offers you the possibility of chatting with a support representative during the week days. I picked this option and 2 seconds later, I was chatting. I hope this wait time will stay the same!

image

Now, go back to your code and port all your beautiful Windows Phone apps to Windows 8!

Security helper class that encrypt/decrypt settings and files

Even though the Windows Phone platform is more secure than either iOS or Android, it is always good practice to encrypt sensitive data.

I created a small SecurityHelper class that handles the encryption and the decryption of application settings and files.

The usage of the class is easy as:

SecurityHelper.WriteSetting("Username", "Sébastien");

string username = SecurityHelper.ReadSetting("Username");

The complete usage is described in the following sample code (which is also available in the downloadable Sample project below):

using System.Diagnostics;
using DotNetApp;

namespace SecurityHelperApp
{
    public partial class MainPage
    {
        public MainPage()
        {
            InitializeComponent();

            // Write and read an ApplicationSetting into the IsolatedStorageSettings
            WriteReadSettingExample();

            // Write and read a file with the specified string content
            WriteReadFileWithStringContentExample();

            // Write and read a file in a sub folder with the specified string content
            WriteReadFileInSubFolderWithStringContentExample();

            // Write and read a file with the specified bytes content
            WriteReadFileWithByteContentExample();
        }

        #region Private Methods

        private void WriteReadSettingExample()
        {
            SecurityHelper.WriteSetting("Username", "Sébastien");

            string username = SecurityHelper.ReadSetting("Username");

            Debug.Assert(username == "Sébastien");
        }

        private void WriteReadFileWithStringContentExample()
        {
            SecurityHelper.WriteFile("File1.txt", "I love Windows Phone");

            string content = SecurityHelper.ReadFile("File1.txt");

            Debug.Assert(content == "I love Windows Phone");
        }

        private void WriteReadFileInSubFolderWithStringContentExample()
        {
            SecurityHelper.WriteFile("Metro/SubFolder/File3.txt", "I love the Metro design");

            string content = SecurityHelper.ReadFile("Metro/SubFolder/File3.txt");

            Debug.Assert(content == "I love the Metro design");
        }

        private void WriteReadFileWithByteContentExample()
        {
            byte[] content = new byte[] {1, 2, 3, 4, 5};
            SecurityHelper.WriteFile("File2.txt", content);

            byte[] readContent;
            SecurityHelper.ReadFile("File2.txt", out readContent);

            Debug.Assert(content[0] == readContent[0] && content[1] == readContent[1] && content[2] == readContent[2] && 
                content[3] == readContent[3] && content[4] == readContent[4]);
        }

        #endregion
    }
}

Download SecurityHelper
Download Sample project

How to create a spinner control

Most of the commercial components of Windows Phone contain a spinner control. However, if you can afford to buy a licence, you can use the one I provide below.

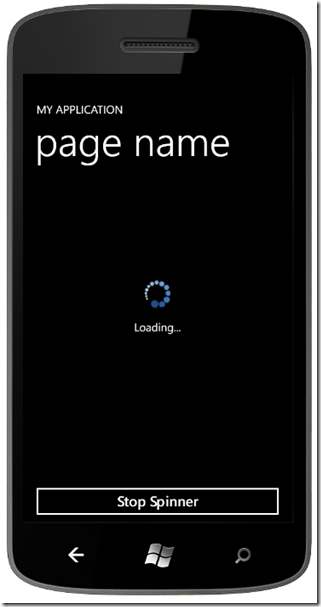
Here is a screenshot:

Spinner

To include the SpinnerControl in your project, you need to:

1- Unzip SpinnerControl.zip.
2- Add the three unzipped files to your project in the root.
3- Set the build action of the Spinner.png to Content
4- Add the SpinnerControl XAML code.

If you look at my sample project, which is an empty Windows Phone application (see download link at end of blog post), you will see:

    <DotNetApp:SpinnerControl Grid.RowSpan="2"
                              IsSpinning="True"
                              Status="Loading..."
                              VerticalAlignment="Center"
                              x:Name="spinner"/>

The simple SpinnerControl that I provide contains only 2 bindable properties:

IsSpinning: When it is set to true, the spinner rotates and it is visible. When it is set to false, the control is collapsed.

Status: This property is optional and it is used to put text under the spinner. It is useful if you wish to display the progress.

If we look at the file in more detail, SpinnerControl.xaml has is two important parts:

1- The Storyboard to rotate the image

    <Storyboard x:Name="StoryBoardAnimateSpinner">

      <DoubleAnimation AutoReverse="False"
                       Duration="0:0:2"
                       From="0"
                       RepeatBehavior="Forever"
                       Storyboard.TargetName="SpinnerTransform"
                       Storyboard.TargetProperty="Angle"
                       To="360" />

    </Storyboard>

This storyboard can be translated to: The image will rotate through 360 degrees every two seconds at a constant rate of rotation, and will continue to rotate forever. If you wish, you can set it to rotate through 360 degrees at a different speed, for example, every five seconds instead of every two seconds. You simply need to modify the Duration property.

2- The Image

    <Image Height="50"
           Margin="10,10"
           Source="/Spinner.png"
           Stretch="Uniform"
           Width="50"
           x:Name="spinImage">

      <Image.RenderTransform>

        <RotateTransform x:Name="SpinnerTransform"
                         CenterX="25"
                         CenterY="25" />

      </Image.RenderTransform>

    </Image>

The Height and Width of spin image need to be equal, otherwise, you’ll get a weird rotation. The CenterX and CenterY need to be half the value of the Height (or Width). The image Spinner.png that I provided in the SpinnerControl is 40 x 40, but in the above code, I specified 50 x 50 and I made sure to set the Stretch property to Uniform.

The other control in the SpinnerControl is a TextBlock which you probably know. You can configure it with your own values and you can even add dependency properties to the control to make it more general.

Download SpinnerControl
Download Sample project

Running two emulators can help to design and debug

Recently, I discovered involuntarily that it is possible to run simultaneously the Windows Phone Emulator 512 MB and the Windows Phone Emulator 256 MB at the same time.

image

While tweaking and adjusting the user interface, having both emulators side-by-side can help you compare your changes.

Make sure you download the Windows Phone SDK 7.1.1. As a reminder, it is always a best practice to test if your application can run on a 256 MB device.

After installing the Windows Phone SDK 7.1.1, you’ll have this selection of emulators:

image

1- Start debugging with the 512 MB emulator.
2- Stop debugging.
3- Select the 256 MB emulator and start debugging.
4- Now, you can start manually your application on the 512 MB emulator.