How to fix the standard header of a pivot control using a style and how to fix a page using the TitleControl
When I first read the excellent book 101 Windows Phone 7 Apps by Adam Nathan, I was surprised to learn that if you create a “Windows Phone Application” or a “Windows Phone Pivot Application” in Visual Studio, the application title is not displayed as it is the built-in metro applications of the Windows Phone OS.
If you want to see the differences for yourself, follow these steps:
1- Create a “Windows Phone Pivot Application”.
2- In the MainPage.xaml, change the “MY APPLICATION” title to “SETTINGS”.
3- Change the header name of the first pivot item from “first” to “system”.
4- Change the header name of the second pivot item from “second” to “application”.
5- Run the application.
You’ll see:
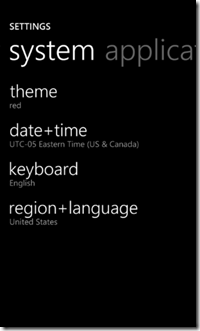
Now, exit the application and go in the “Settings” application of the emulator, then look at the page:
Do you see a difference in the “SETTINGS” application title?
To approximate the same design as the OS, the author suggests a style that you can apply to your pivot control:
<Style x:Key="PivotStyle" TargetType="controls:Pivot"> <Setter Property="TitleTemplate"> <Setter.Value> <DataTemplate> <TextBlock FontFamily="{StaticResource PhoneFontFamilySemiBold}" FontSize="{StaticResource PhoneFontSizeMedium}" Margin="-1,-1,0,-3" Text="{Binding}" /> </DataTemplate> </Setter.Value> </Setter> </Style>
Apply the style:
<controls:Pivot Title="SETTINGS" Style="{StaticResource PivotStyle}">
The same issue happens with every page (PhoneApplicationPage). Instead of applying the fix to all the pages of an application, I created the TitleControl (the code is available for download at the end of the article).
Two of the goals behind the TitleControl were:
1- Get rid of all the XAML code that displays the header.
2- Remove the unnecessary extra grid that displays the header and the content. Remember, if you can have less containers like panels, a grids, or stack panels in a page, your loading speed will be faster.
So, instead of having the following XAML code:
<Grid x:Name="LayoutRoot" Background="Transparent">

 <Grid.RowDefinitions> <RowDefinition Height="Auto"/> <RowDefinition Height="*"/> </Grid.RowDefinitions> <!--TitlePanel contains the name of the application and page title--> <StackPanel x:Name="TitlePanel" Grid.Row="0" Margin="12,17,0,28"> <TextBlock x:Name="ApplicationTitle" Text="MY APPLICATION" Style="{StaticResource PhoneTextNormalStyle}"/> <TextBlock x:Name="PageTitle" Text="page name" Margin="9,-7,0,0" Style="{StaticResource PhoneTextTitle1Style}"/> </StackPanel> <!--ContentPanel - place additional content here--> <Grid x:Name="ContentPanel" Grid.Row="1" Margin="12,0,12,0"> <TextBlock Text="Hello World" /> </Grid>

 </Grid>
The code can be reduced to:
<Grid x:Name="LayoutRoot" Background="Transparent"> <Grid.RowDefinitions> <RowDefinition Height="Auto" /> <RowDefinition Height="Auto" /> </Grid.RowDefinitions> <Controls:TitleControl TitleName="SETTINGS" PageName="theme" /> <TextBlock Grid.Row="1" Margin="24,0" Text="Hello World" /> </Grid>
If you have a brand theme, you can override the color and the font directly in the TitleControl or you can add additional dependency properties to the control.
Download TitleControl
Download Sample project


